Easy Halloween treats for kids work best when you plan the session before you melt a single chocolate chip. This guide walks you through choosing recipes by effort level, balancing sweet and savory options, setting up no-bake and baking projects, and handling allergens and storage — all grounded in published sources rather than invented kitchen tests. You will find practical decisions, prerequisites, and clear steps so you can run a treat-making session that fits your family's time and comfort level.
Planning Easy Halloween Treats for Kids
Start by deciding what the treats are for: a classroom party, a Halloween gathering, a lunchbox surprise, or a cozy afternoon at home. Sources describe these recipes as doubling as classroom snacks or Halloween party table stars, so the occasion shapes how many treats you need and how portable they must be. Next, choose by effort. Some recipes are quick no-bakes, while others are fun projects for a cozy afternoon. Match the effort to the attention span you actually have. If you are cooking with very young children, prepare the baking and cooling stages in advance and leave the decorating as the main activity. Older children may enjoy measuring ingredients, mixing batter, and helping to assemble simple desserts. A useful planning step is to pick one or two treats rather than a whole spread. The sources emphasize that many of these recipes are great for decorating help — cookies, bark, and cupcakes especially — so a single decorating-focused treat can carry the session. For a broader seasonal cooking rhythm, see these easy fall dinner ideas for busy weeknights to balance the sweet treats with real meals. Before you shop, read each recipe through and note which steps require an oven, stove, or knife. Those are the adult-only steps. Everything else — dipping, sprinkling, pressing, shaping, and decorating — is where kids can take over. This separation keeps the session moving and reduces the chance that a child loses interest while an adult manages heat or sharp tools.
Tips
- Choose the occasion first: classroom, party, lunchbox, or home activity.
- Pick one or two treats instead of a full spread to keep the session manageable.
- Pre-read each recipe and mark adult-only steps before kids join in.
Balancing Sweet and Savory Options
A table of only candy-inspired treats can overwhelm young guests. Sources recommend mixing sweet and savory to keep kids balanced by pairing candy-inspired treats with fruit or veggie-based ones. Savory options in the source material include mummy hotdogs made with crescent-roll-wrapped hotdogs, French bread mummy pizza, and bewitching breadsticks made from pizza dough brushed with melted garlic butter and Parmesan. These give kids a break from sugar and often double as dinner before trick-or-treating. On the sweet side, sources describe candy corn bark, graveyard pudding cups, dirt cake with gummy worms, and caramel apples. The practical move is to offer at least one savory item alongside the sweets. If you are serving a group, label what each item contains. Sources note that you should label treats containing common allergens where appropriate, particularly when serving guests who may not know the ingredients. For a lunchbox-friendly balance during the school week, these easy kids lunch box meals for back to school show how savory and sweet can share a menu without the Halloween theme. Keep portions small. Bite-sized desserts and snacks are easier for little hands and let kids try more than one thing without a full serving of each.
Tips
- Pair at least one savory item with the sweets.
- Label common allergens when serving a group.
- Keep portions bite-sized so kids can try several items.
No-Bake Treats for Little Hands
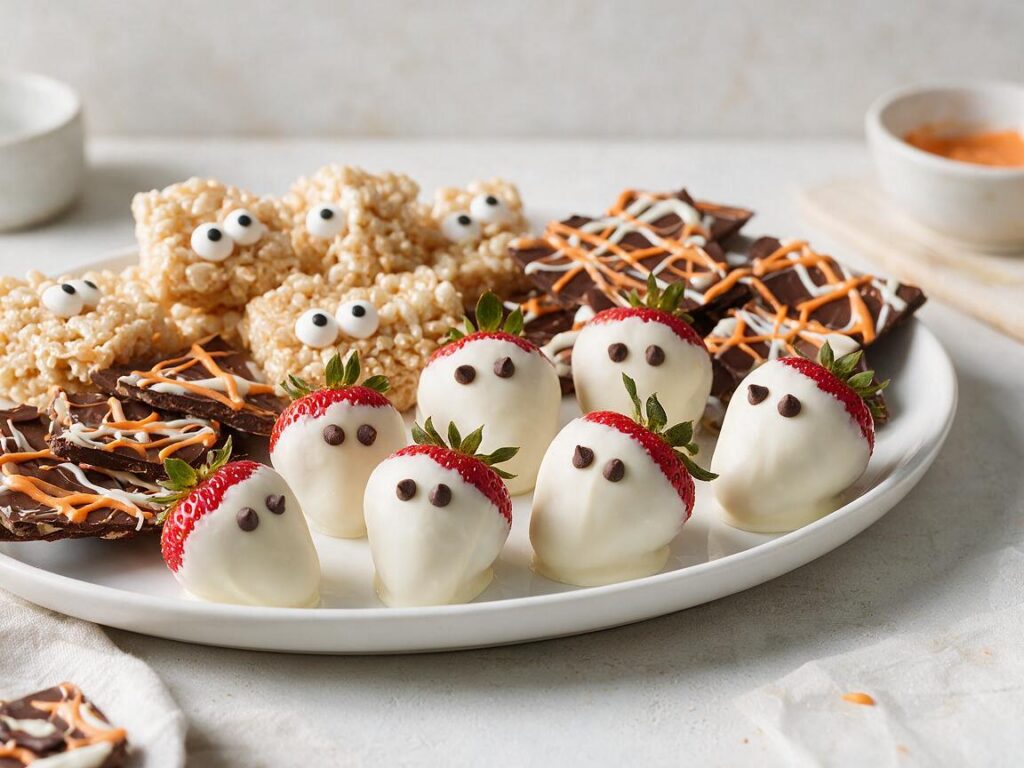
No-bake treats are the lowest-barrier entry point because they avoid baking, though melting chocolate still requires an adult-managed heat source. Sources describe no-bake treats that involve dipping crackers in melted chocolate and hazelnut spread before topping them with chopped Halloween candies. Other no-bake ideas include rice cereal treats shaped into monsters, strawberry ghosts made with white chocolate and mini chocolate chips, and cookies-and-cream mummy bark made with white chocolate, chopped sandwich cookies, and mini candy eyeballs. The common thread is that kids can do most of the work: dipping, pressing, sprinkling, and placing candy eyes. Melting chocolate is the one step that needs adult supervision, whether you use a double boiler or a microwave with stirring every 30 seconds until smooth. Sources also describe a no-bake Halloween treat bar that combines spooky sweets with crispy rice cereal and melted chocolate, finished with edible googly eyes. For a no-bake session, set up a workstation with parchment or foil, melted chocolate in a bowl or piping bag, and small bowls of toppings. Sources note that using gloves and working on foil makes cleanup easier for sticky marshmallow-based decorations. Let kids decorate to their heart's desire; the sources explicitly say Halloween food does not need to look perfect, and a crooked chocolate-chip ghost face can be part of the fun.
Materials
- Melted chocolate or candy coating
- Parchment paper or foil
- Small bowls for toppings
- Candy eyeballs, sprinkles, or chopped candies
- Piping bag or zip-top bag for drizzling
Steps
- Line a tray or work surface with parchment or foil.
- Verify the remaining project-specific details before starting.
- Let kids dip, spread, or drizzle the base treat.
- Add toppings and candy eyes while the chocolate is still tacky.
- Let treats set at room temperature or in the refrigerator before serving.
Tips
- Use gloves and foil for sticky marshmallow decorations to simplify cleanup.
- Keep melted chocolate away from very young children.
- Embrace imperfect decorations as part of the fun.
Simple Baking Projects with Adult Help
Baking projects add a different kind of fun, but they require adult help for the oven and hot trays. Sources advise supervising children around hot ovens, baking trays, and kitchen equipment, and allowing baked goods to cool fully before decorating. A practical division of labor is for adults to handle measuring, mixing, baking, and cooling, while kids take over decorating once the baked goods are cool. Simple baking projects in the source material include chocolate-cinnamon skeleton cookies made with a gingerbread man cookie cutter and piped icing, pumpkin pie cookies that can be frosted to look like mini pumpkin pies or jack-o-lanterns, and brownies decorated with white chocolate for ghostly shapes or orange icing and chocolate chips for monster faces. Sources also describe chocolate tartlets made with ready-made sweet tart shells and a smooth chocolate ganache, finished with chocolate curls or orange icing. For a family baking session, choose recipes with simple steps and plenty of opportunities for decorating so everyone can take part. If you want a breakfast treat to go with the Halloween theme, these back-to-school breakfast ideas for kids offer everyday options that can be adapted with seasonal shapes. Remember that the quality of your chocolate matters for flavor and texture, especially in ganache and fillings, so use pure chocolate rather than chocolate chips when a recipe calls for melting.
Materials
- Cookie cutters (gingerbread man, ghost, or pumpkin shapes)
- Piping bag or zip-top bag with a small opening
- Powdered sugar and water or milk for simple icing
- Cooled baked goods
- Sprinkles, candy eyes, and chocolate chips for decorating
Steps
- Bake and cool the base treats completely before decorating.
- Mix icing to a thick-cream consistency, adjusting with water or powdered sugar.
- Pipe or spread icing onto cooled cookies or brownies.
- Add candy, sprinkles, or chocolate chips for faces and details.
- Let icing set before stacking or storing.
Tips
- Adults handle the oven, stove, and hot trays.
- Cool baked goods fully before kids decorate.
- For bark and ganache, pure chocolate melts more smoothly than chips; follow the recipe's recommendation.
Decorating Stations for Creative Fun
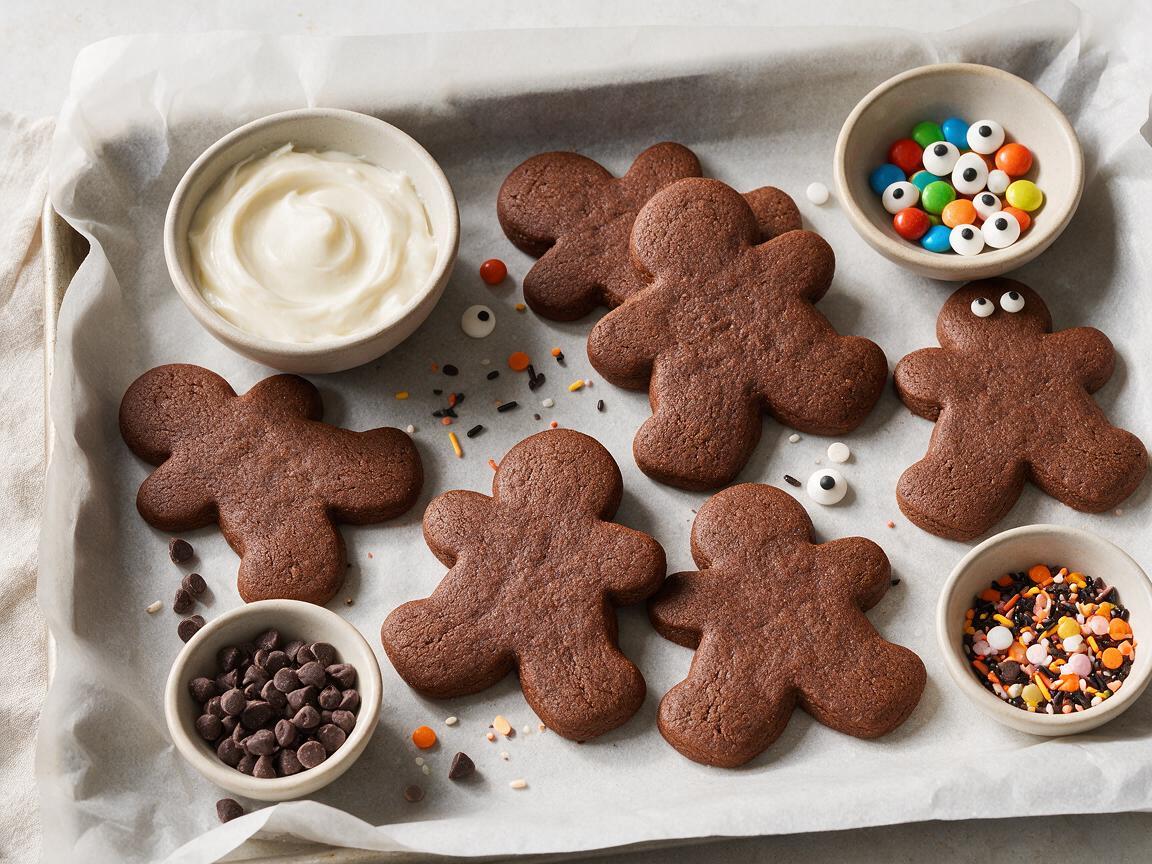
A decorating station turns treat-making into an activity that keeps kids engaged without requiring them to handle heat or sharp tools. Sources describe setting up a Halloween decorating station with cooled biscuits, bowls of icing, chocolate chips, and a small selection of sprinkles, where everyone can make their own spooky designs. The same approach works for cupcakes, cookies, and bark. For younger children, prepare the baking and cooling stages in advance, leaving the decorating as the main activity. Older children may enjoy measuring ingredients, mixing batter, and helping to assemble simple desserts. Sources also suggest letting kids choose icing colors, add chocolate chips, and create simple ghost or monster faces. If you are decorating cookies, a simple mix of powdered sugar and water or milk creates a thick frosting that can be piped into lines and dots. Sources describe using a pastry bag with a #2 piping tip for precise lines, but a zip-top bag with a very small opening works as a substitute. For skeleton cookies, the technique involves piping dots and lines to form bones, a skull outline, and a rib cage, then letting the icing dry at room temperature overnight or for several hours before serving. A decorating station also gives kids a sense of ownership over the final treat, which sources note can make healthier options more exciting.
Materials
- Cooled cookies, cupcakes, or brownies
- Bowls of icing in Halloween colors
- Sprinkles, candy eyes, and small candies
- Piping bags or zip-top bags
- Toothpicks for detail work
Steps
- Set out cooled treats and decorating supplies in separate bowls.
- Show kids how to pipe or spread icing onto their treat.
- Let them add sprinkles, candy eyes, and other toppings.
- Adults use toothpicks to adjust details if needed.
- Let decorated treats dry before serving or packing.
Tips
- Prepare baking and cooling in advance for younger children.
- Use a zip-top bag with a small cut corner if you do not have a piping tip.
- Let kids make their own designs rather than aiming for perfection.
Healthier Swaps and Allergen Awareness
Halloween treats do not have to be all candy. Sources describe healthier options that use fruit, nuts, dark chocolate, nut and seed butters, yogurt, popcorn, and whole grains. Examples include banana ghosts made with half a banana, dark chocolate, and thick plain yogurt; kiwi mummies with chilled kiwi, dark chocolate, and yogurt; mandarin pumpkins with a small piece of celery; and cheese eyes made with fresh cheese, black olive, and crushed tinned tomato. These recipes are designed to be made together, with children doing almost every step and adults handling knives and the oven. When making healthier swaps, sources suggest asking whether you can include fruit, whole grains, protein, or healthy fats, and whether you can use ingredients with less added sugar or make a homemade version where you control what goes in. Allergen awareness is essential when serving a group. Sources advise checking ingredients for allergies before sharing treats and labeling treats containing common allergens. For nut allergies, create a nut-free version using seeds, dried fruit, cereal, and other allergy-friendly ingredients, and always check labels carefully when preparing food for a group. When in doubt, defer to the host or school allergen policy. If you are avoiding potential allergens in a recipe like apple vampire teeth, sunflower seed or soy butter work well in place of peanut butter. The goal is not perfection; sources note that healthier treats can still taste like treats and that Halloween only comes once a year.
Tips
- Use fruit, yogurt, and dark chocolate for naturally sweet treats.
- Check labels and label common allergens when serving a group.
- Offer a nut-free version using seeds and dried fruit when needed.
Serving and Storing Your Treats
Verify the remaining project-specific details before starting.
Tips
- The specific cookies in one source recipe keep at room temperature for 5-6 days or in the freezer for up to 2 months; follow food-safety guidance for other treats.
- Remove chilled dips from the fridge about 30 minutes before serving.
- Separate edible treats from non-edible decorations on the table.